Needles are Pattern Makers
The One Thing Artists Must Know About Needles
If you remember just one rule, make it this: needles are pattern-makers—choose by the healed pattern you want, not by the label. Every diameter, taper, configuration, and spacing is simply a tool for shaping pixels on skin. Start with the destination (healed look), then pick the vehicle (needle) and tune your driving (technique).
Start With the Healed Pattern
Name the finish you want:
-
Airy pixels
-
Soft haze/velvet blend
-
Crisp line
-
Solid fill/saturated field
That target instantly narrows your choices and stops “needle roulette.”
Match Hardware to Outcome
-
Diameter → dot size & feel
Smaller (e.g., 08) = finer, lighter dot; larger = bolder, stronger dot. -
Taper → sharpness & trauma control
Long taper = finer entry, smoother pixels; short = stronger ink deposit, faster build. -
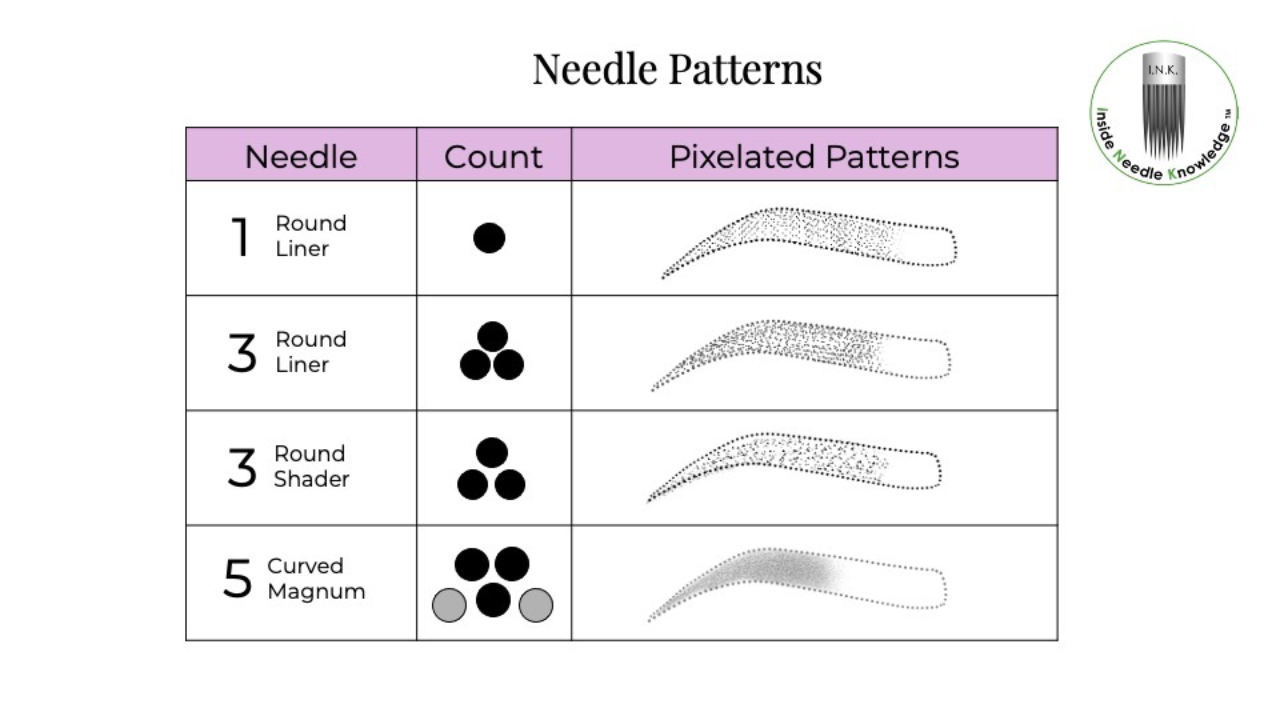
Configuration & spacing → footprint
1RL = precision. 3RL = tighter dots/lines. Curved mag = broad, soft blend.
Spaced groupings = more air between pixels.
Tune the Technique (the Real Differentiator)
Your needle only performs as well as you pilot it:
-
Hand speed & machine speed: align them so you don’t outrun the stroke your trying to create.
-
Angle & depth: adjust to land ink in upper dermis consistently.
-
Pressure & stretch: lighter pressure + strategic stretch = cleaner pixels.
-
Pigment flow: manage viscosity and tip loading for even deposit.
Micro-Cheat Sheet
-
Crisp detail: 08–10 1RL, long taper, light pressure, controlled stretch.
-
Soft blend: small curved mag or spaced 3, pendulum motion, gentle stretch.
-
Balanced line + shade: 3RL long taper, moderate speeds, shallow angle.
Fast Troubleshooting
-
Dots too tight / muddy: open spacing or angle, lighten pressure, increase stretch clarity.
-
Too airy / patchy: tighten grouping, slow hand slightly, ensure steady tip loading.
-
Drag or chatter: check membrane tension, cartridge alignment, and solder quality.
Bottom Line
Stop choosing by habit or hype. Let the desired healed look drive the needle choice, then tune your technique to deliver that pattern in that skin. That’s Inside Needle Knowledge!
To your PMU success,
![]()
PMU Artist & Needle Specialist
Inside Needle Knowledge
Purchase the I.N.K. Course Now