The Secret to Skin Space
Skin Space isn't an area I forget to tattoo- it's an intentional design choice that helps create brows that heal beautifully and age naturally!
My Technique: Preparing the Skin Before the Pigment
One of the ways I consistently create soft, natural brows is by resisting the urge to chase immediate saturation.
Instead, I prepare the skin first.
I begin with what I call a priming pass—a quick, feather-light pass using little to no pigment. My goal isn’t to implant color during this first pass. It’s simply to prepare the skin.
In my experience, this gentle priming pass helps the skin become more receptive to the following pigment passes. Rather than trying to force pigment into resistant skin, I prepare the canvas first.
I also prefer to work with a slower machine speed than many artists. A slower speed encourages me to work more deliberately, allowing me to carefully observe how the skin is responding rather than rushing to achieve immediate saturation.
After priming, I intention...
Needles are Pattern Makers
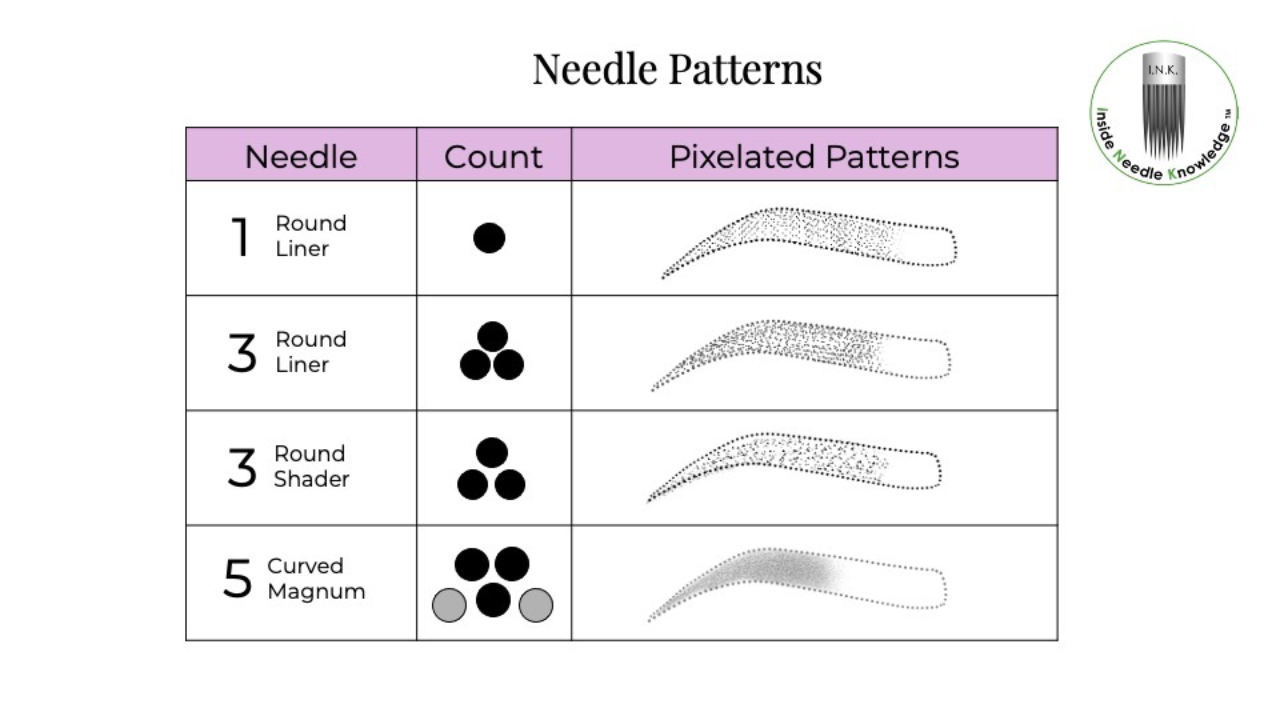
The One Thing Artists Must Know About Needles
If you remember just one rule, make it this: needles are pattern-makers—choose by the healed pattern you want, not by the label. Every diameter, taper, configuration, and spacing is simply a tool for shaping pixels on skin. Start with the destination (healed look), then pick the vehicle (needle) and tune your driving (technique).
Start With the Healed Pattern
Name the finish you want:
-
Airy pixels
-
Soft haze/velvet blend
-
Crisp line
-
Solid fill/saturated field
That target instantly narrows your choices and stops “needle roulette.”
Match Hardware to Outcome
-
Diameter → dot size & feel
Smaller (e.g., 08) = finer, lighter dot; larger = bolder, stronger dot. -
Taper → sharpness & trauma control
Long taper = finer entry, smoother pixels; short = stronger ink deposit, faster build. -
Configuration & spacing → footprint
...
1RL = precision. 3RL = tighter dots/lines. Curved mag = broad, soft blend.
Spaced groupings = m
Breaking the Rules: Using Liners for Shading and Shaders for Lining

Breaking the Rules: Using Liners for Shading and Shaders for Lining
Intro:
When we first learn about tattoo needles, we're often told to follow the rules: liners are for lines, shaders are for shading.But seasoned artists know—true artistry begins where convention ends. The truth is, with the right technique, liners can shade beautifully, and shaders can line with confidence. The key lies in understanding how the needle is used, not just how it's labeled.
Why Break the Rules?
Using needles outside their conventional roles opens up new possibilities for texture, depth, and style. It allows you to create hybrid effects, build delicate transitions, or add bold structure using tools others may overlook. More importantly, it forces you to focus on technique—hand speed, pressure, and movement—rather than relying solely on the tool.
Liners for Shading: Control, Detail & Pixelation
A round liner, like a 1RL or 3RL, has tightly grouped needles that deliver precise, compact pigment. ...
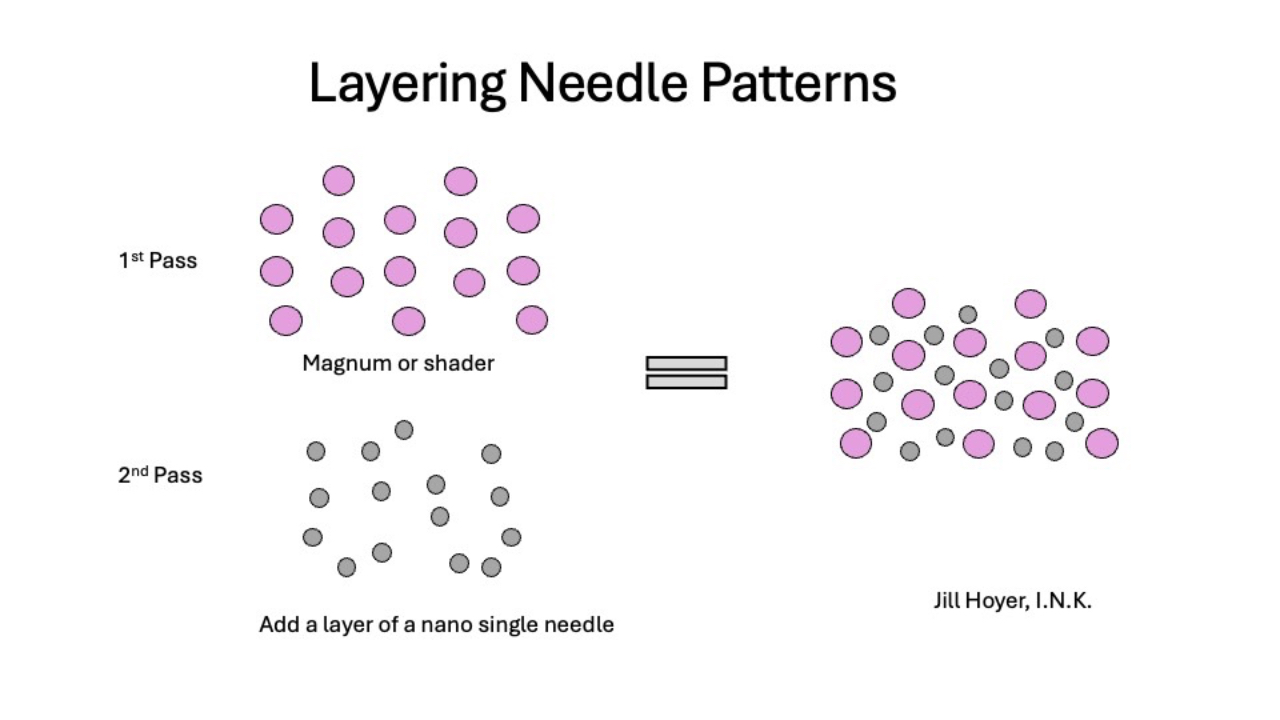
The Art of Combining Needle Patterns in Permanent Makeup
Unlocking Creativity:
Permanent makeup artists understand that mastering needle configurations is foundational. But once you've grasped the basics, a transformative technique awaits: combining different needle patterns.
Why Combine Needle Patterns?
The true artistry of permanent makeup goes beyond using a single needle type. By strategically mixing patterns—like round liners, round shaders, and magnums—you can achieve dynamic results, depth, and dimension that a single needle pattern can't replicate.
Benefits of Mixing Needle Patterns:
1. Enhanced Dimension and Depth
Using multiple needle patterns can create layered effects. For example, starting with a curved magnum for a soft base layer and finishing with a fine round liner for precision detailing can add striking realism.
2. Versatile Textures
Different patterns yield distinct textures. Combining soft, pixelated patterns from round shaders with precise, crisp lines from round liners can elevate your artistry, creating lifeli...
The Thickest Thin...Eyeliner

Why I Don’t Do Thick Permanent Eyeliner
I get this question a lot—“Can you do a thicker liner?” My answer to my client is: I specialize in precision, longevity, and results that age beautifully.
🔹 Thicker liners don’t heal the way you think. Over time, ink can spread and blur, especially on the delicate eyelid skin.
🔹 Crisp, fine lines last longer. My technique ensures the pigment stays where it should, giving you a timeless, elegant look.
🔹 My thickest is still “thin” for a reason. I create defined, balanced eyeliner that enhances your eyes—without overpowering them.
If you are a PMU artist reading this, you might wonder "what needles" to use for the eyeliner or eyelash enhancement.
My personal rule of thumb is based on the size of the liner and the effect (defined or soft) Since I do smaller types of liners by largest needle would be a 5RS. I usually switch to a smaller needle for the inner eye where the line tapers. Here I would usually use a 1RL, 3RL or sometimes a 3RS. Swit...
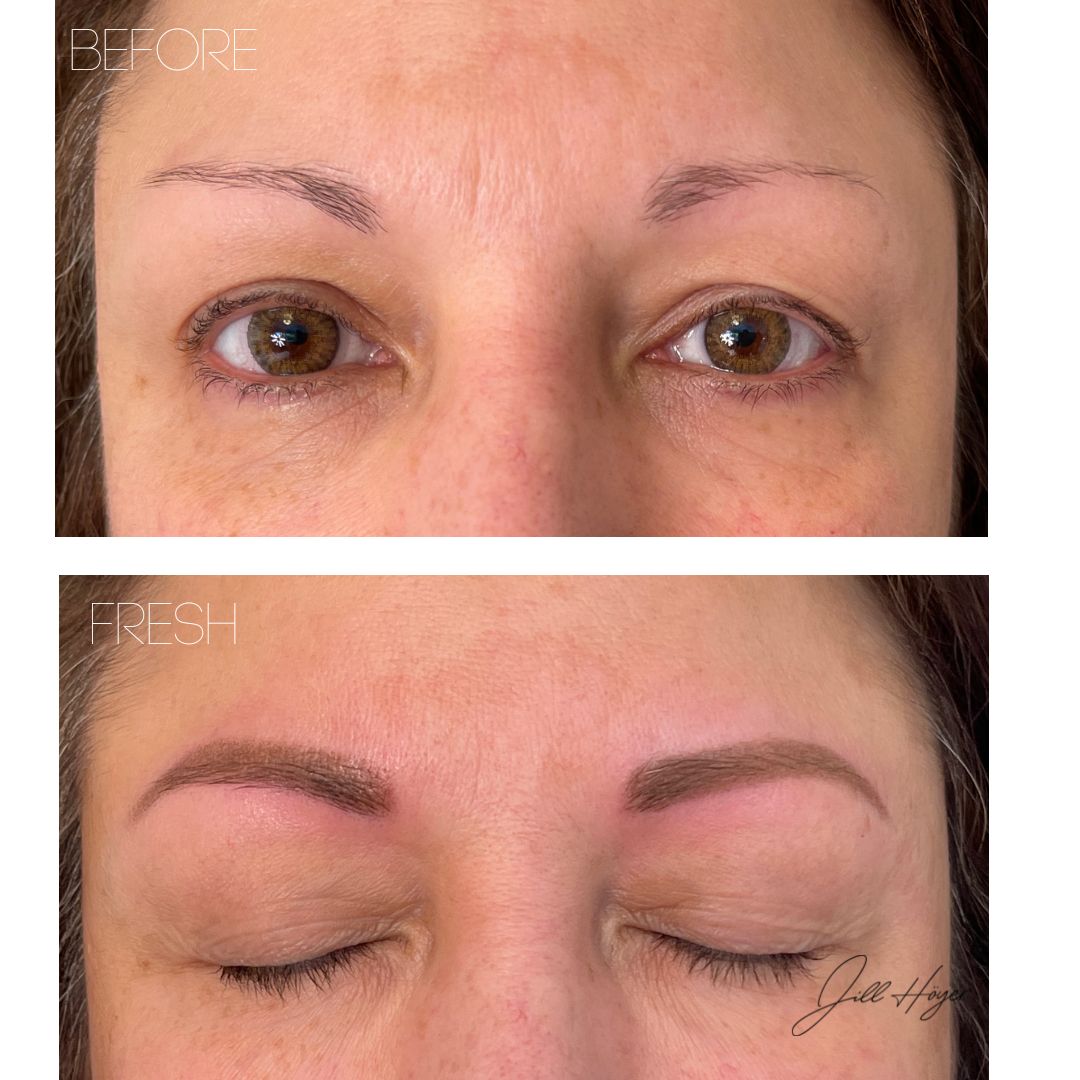
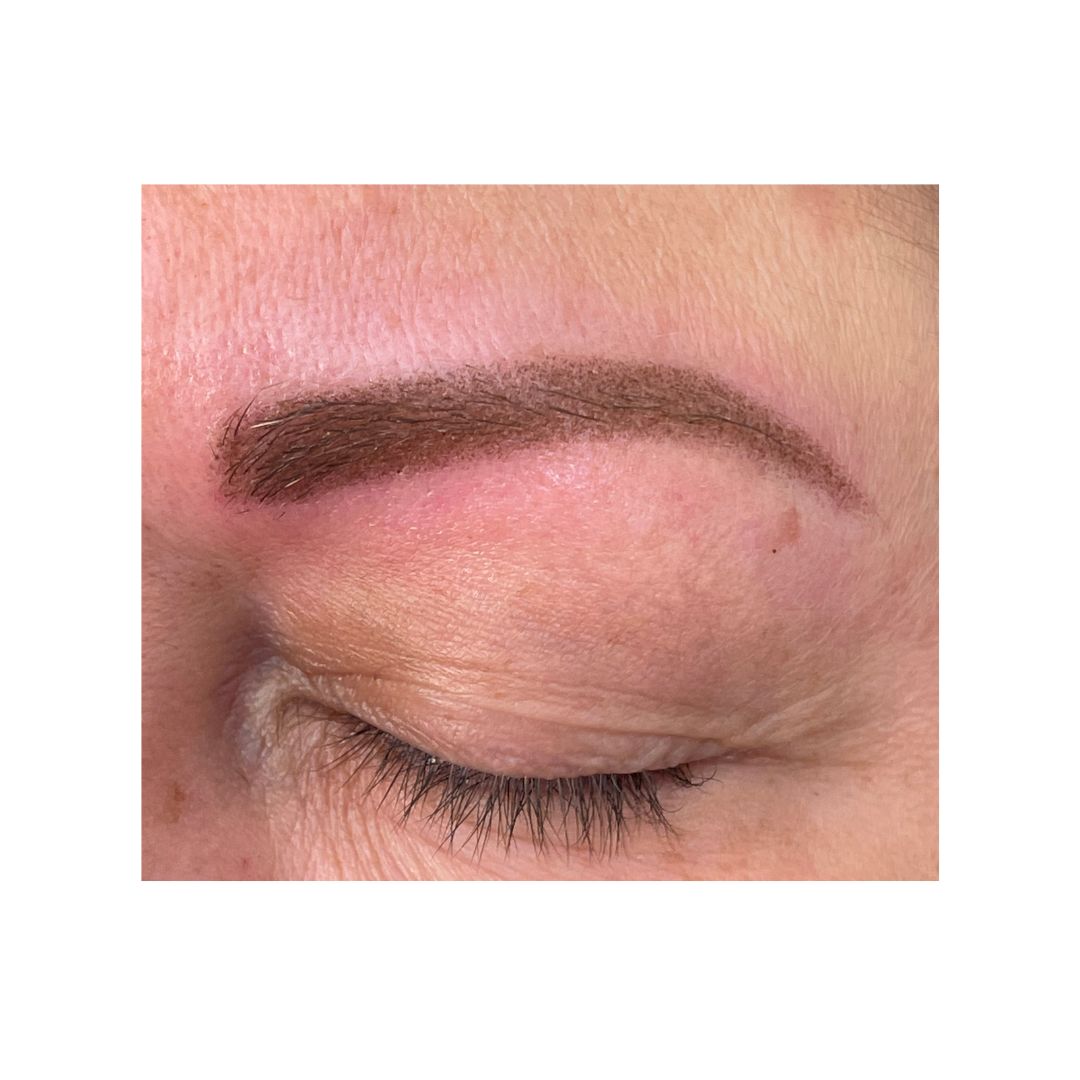
The Brushed Brow Technique

The Brushed Brow Technique:
The brushed brow technique is a style of permanent makeup, offering a soft, dimensional finish that mimics the effect of makeup applied with a brush. This technique is perfect for clients with mature skin, as it creates a natural, shaded look that blends beautifully with their unique skin texture. Let’s dive into the details of this approach, who it’s for, and how you can achieve stunning results.
Who is the Brushed Brow Technique For?
This technique is ideal for clients with:
-
Mature skin: Wrinkles, prominent pores, or uneven texture can make crisp hair strokes from a Nano or hair stroke technique heal poorly. The brushed brow offers a softer, more forgiving alternative.
-
Skin with oddities or prominent texture: The diffused, pixelated effect of the brushed brow adapts better to these conditions, delivering a smoother, more natural result.
-
Clients seeking a soft makeup look: This style is perfect for anyone who loves the appearance of s...
Mastering the Art of Shading Needles in Permanent Makeup: Elevating Your Craft

As a permanent makeup (PMU) artist, the choice of needles is essential for delivering flawless, long-lasting results. Shading needles, in particular, play a crucial role in creating depth, subtle gradients, and a natural appearance. Whether you’re a seasoned professional or a newcomer in the PMU world, understanding the ins and outs of shading needles can significantly enhance your artistry and client satisfaction. Let’s delve into why shading needles are vital and how to master their use in your craft.
1. Understanding Shading Needles and Their Types
Shading needles are designed to implant pigment in a way that mimics natural gradients and soft edges. Although outlining needles create defined borders they can be used for shading with proper hadn't and machine speed. Typical shading needles are meant for smooth transitions and depth. Here are the common types used in PMU:
-Round Shaders (RS): These needles are grouped in a circular pattern and can be used for small areas that req...

How many tattoo needles should I use?

Given that permanent makeup is a detailed procedure and we are tattooing various skin types, it makes sense to be prepared with a variety needle options, even for one procedure. When it comes to choosing needles my client's skin and desired results are number one factors that I consider prior to selecting needles. Per procedure, I usually have 3 needles ready to choose from.
With 20 years experience behind the needle, I can use a variety of needles however, there is usually a choice that works better for the skin and procedure details at hand.
As an example, I love curved magnums for brows, eyes and lips. Many artists use this needle for eyeliner, however, I don't find this the best option. When navigating the 2 rows of needles with magnums, you can easily loose precision that the liner requires. I would prefer a liner or shader needle for more precision. However, if you prefer using magnums on the eyes you could use them above the line and softly feather in a dusting of color a...
Areola Tattooing with Pointillism
After the 1st pass…
(Post mastectomy and reconstruction due to breast cancer)
In the video I’ve finished my first pass. Im layering in texture and details with a pure ink (no dilution).
This can be done after my first pass and/or reinforced at the end of the procedure.
You will mainly see 2 techniques with a 3RL that add:
✔️Details
✔️Texture
✔️Shadow
✔️Highlights
⚪️Pointillism- a controlled in and out movement that adds specific color and works well over scar areas with light-medium pressure depending on the thickness of the skin and scar.
⚪️⚪️⚪️Stippling- a looser more surface movement that “speckles” in color with no specific pattern. This works well for texture and I often cross dip colors (no rinsing) as the desired result is mottled.
See the next post for a continuation using a curved magnum needle.
If you’re new to areola tattooing, I do suggest incorporating multiple needles.
For my style of breast work, I usually have 2-4 needles to give a realistic areola and 3D dimension.
To your PMU...